Saturday, August 14, 2010

The cat's bathroom and new lights


I've always had a cat so not long after Brandon and I got married we got our cat, Lucy. When we moved into our house, I didn't know where we were going to put her litter box. Unfortunately, we don't have a laundry room - just a closet - and I didn't want it out in the bathroom to have to look at all the time (and then there was the issue of it being out for guests to see, too). So, I got the idea to put it in the bathroom cabinets.

We took off the 2 middle doors under the sink. Since I still didn't want to look at it all the time, I decided to put up "curtains". So we hung the rod where it wouldn't hit any of the drawers or the other two doors and I measured what size they needed to be. We had some leftover fabric from the curtains in our kitchen (and what will eventually go in the den/office) and it was the right colors for the bathroom too.
Just some simple panels:

Now, there is a pretty fabric added to the bathroom cabinets and I don't have to look at Lucy's litter!
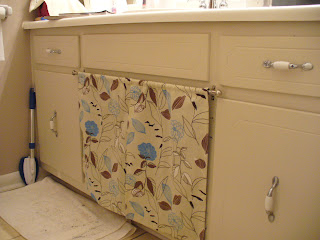
Since before we moved in, I have wanted to replace the light/fan in the living room. Then, while in the midst of shopping for it, the lights in the dining area started shorting out, leaving only one light working most of the time. So, we ended up buying something new for both at the same time and asked a friend to help us put them up - 4 hours later, the rooms look so much more updated!!

The dining area before (notice only 1 light is working):
The dining area after (we decided to go with just a light instead of a fan):
The living room before - I turned on the lovely globe on top so you could get the full effect of how hideous it really was!

The living room after - what a change! I can't believe what a difference the new fan makes!

Friday, August 13, 2010

It's been a while...


Well, maybe I've not been so great with updating but I have been busy. Look for several projects I've done this summer in the midst of many youth trips, trips to see family, and general summer fun.
I love HGTV and I always love the ideas on the shows - especially the low-budget ones! When I saw this tiled fabric covered cork board, I figured why not give it a try - it can't be that hard.

So, I bought some cork squares at Wal-Mart, some cute fabric to match our den where it was going at Hobby Lobby, and got Lowe's to cut me some thin board that was 1 sq in bigger than my cork (so it would have a beveled edge look).

I glued the cork squares to the board

Laid the squares out how they best fit (apparently the guy who cut them at Lowe's wasn't totally exact!)

Then, I used a staple gun to secure the fabric around the boards. I also alternated the direction of the stripe so it'd be a little more interesting.


Getting all the squares put together and hung on the wall was a little more complicated then it was in my head. We ended up using a bigger piece of the same board to put them all together. First we glued, then we stapled, and finally we...ducttaped it - no, not the most professional method but hey, it worked and you can't tell it now!


Saturday, March 6, 2010

Cheese Straws


Sifting the flour, salt, and cayenne pepper.

I borrow another lady's "cookie press". Turns out, it was a cordless caulker with a small star cookie press ring in it.

The first straw:

Hot out of the oven. (I later cut them into short straws to be ready for tomorrow.

Baby gifts

After I got this book for Christmas I decided to make gifts for baby showers from it.

The book had a changing pad and diaper pouch in it. I didn't get pictures of making the changing pad but here is the final product.

For the pouch, I sewed the interior and exterior sleeves. Turned the exterior one right side out and ironed it.
Then, I sewed the flap, turned it right side out, ironed it, and added the velcro.


Then, put the exterior sleeve inside the interior sleeve, with the flap in the center. Then, stitched it closed, leaving 4" open on the side without the flap and then pulled the bag through so it was right side out.

Next, I edge stitched around the top, closing the opening and added the other side of the velcro.

Finished pouch in the other pattern with diapers in it:


I also thought the gift needed something else so I found directions for this wipe case. I almost didn't find the wipe case since Wal-Mart was out of them the first time but I finally found them at Walgreens.

Then, I added the felt.

The fabric - and yes, I was hot glueing on a U-Haul box to protect the carpet.

and the ribbon:


My mom also had the idea to make some burp cloths from left over fabric. We bought pre-folded cloth diapers and at first, used this blog for the "how-to". I didn't get any pictures of the first set of these gifts I made and didn't use the ribbon for the other cloths because I was having trouble with it - so mine is a little different than hers. I just stitched up the sides, and ironed it down 1/2":

Then I put it over the bottom of the diaper and stitched it all the way around the fabric so it wouldn't curl up when it is washed a million times.


2 of the 3 gift sets:

Tuesday, March 2, 2010

A "new" old chair

A few months ago, I went yard saleing with my mom. I had been looking for a small chair to use in my living room and when we saw this chair we thought it would look good recovered and painted. Unfortunately, I didn't get a before picture but it was brown with an really worn out blue corduroy cushion.

First, we painted the chair with a cream that my mom had in her garage.

The finished painted chair:

We also added some brown stain to distress it and give it that "old" feeling.

With the cushion, I had to take out all the rusted nails to take off the worn out fabric and decaying cushion. I added a piece of 2" foam pad cut to the shape of the chair to make it more comfortable. Then, I covered the seat in the fabric and attached with with a staple gun. It's not perfect and I'm sure it's not up to my grandad's standards (who is an upholsterer) but I think it looks nice. I love the fabric, which we found at Hancock's. It adds some pattern to the room!

Finally, in the room.

Monday, March 1, 2010

Taking a try at blogging

Since buying our first home last April, I have enjoyed sewing projects, DIY projects, and new recipes! While continuously perusing other's blogs I decided to create a place to chronicle my own projects and attempts.So here's my try...